
GoAdServer (GAS) allows publishers and mediabuyers to manage campaigns with full control and flexibility. One of its key features is the ability to create and prioritize Direct Deals — pre-negotiated campaigns that bypass auctions and guarantee delivery under specific terms.
In this tutorial, you’ll learn how to create a Direct Deal in GAS step by step.
Go to: Publishing > Direct Deals > Create New Campaign
Step 1: Select Website and Adspace

- Choose the Website and the Adspace where the Direct Deal will be applied.
- Once selected, click the “Create” button to start setting up your new Direct Deal.
If you need help adding a Website, take a look at this guide: How to Add a Website?
If you need more details about creating an Adzone, take a look at this guide: How to create Adzones?
Step 2: Direct Deal Settings
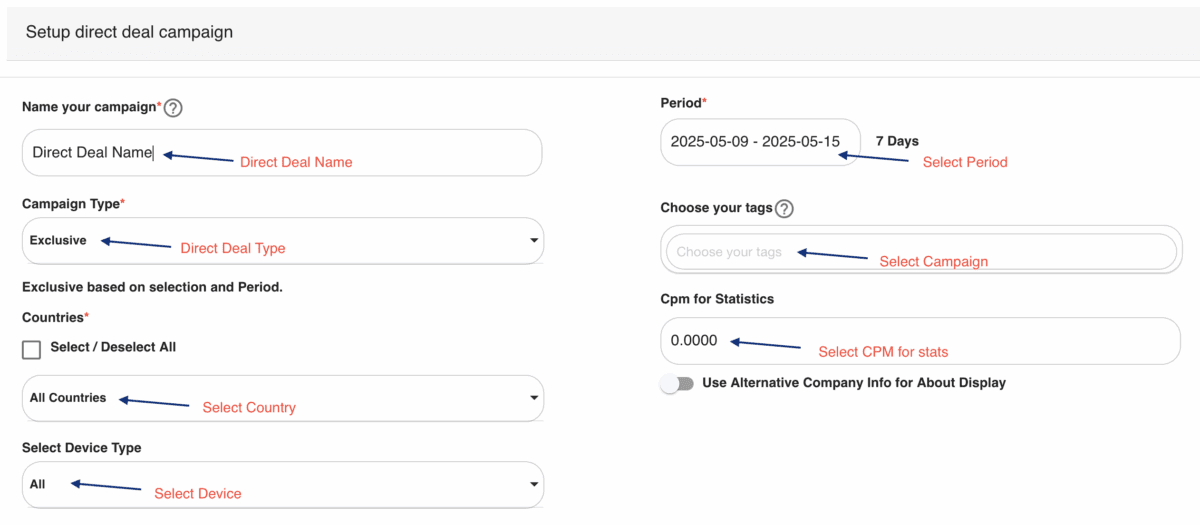
Direct Deal Setup Panel – Field Overview
Name your campaign
- Required. Enter a clear and descriptive name for your Direct Deal (e.g., “Summer Promo – Homepage Banner”).
Period
- Define the start and end dates of the campaign. This sets the time range in which the Direct Deal will be active.
Campaign Type
- Select the type of Direct Deal you want to create (e.g., Exclusive, Capped, Remnant, etc.).
- This determines how the deal behaves and competes with other campaigns.
Choose your tags (optional)
- Add tags to organize or categorize your campaign. Useful for filtering and reporting.
Countries
- Choose one or more countries where the campaign should be active. You can also select “All Countries”.
Select Device Type
- Choose which device types the campaign will run on (e.g., All, Mobile only, Desktop only).
CPM for Statistics
- This field is used for reporting purposes only. It does not affect delivery but helps in estimating campaign value in analytics.
Use Alternative Company Info for About Display (optional)
- Enable this toggle if you want to show a different company name or branding in the ad’s “About” section.
Step 3: Creative Settings
Click “NEW ADD”
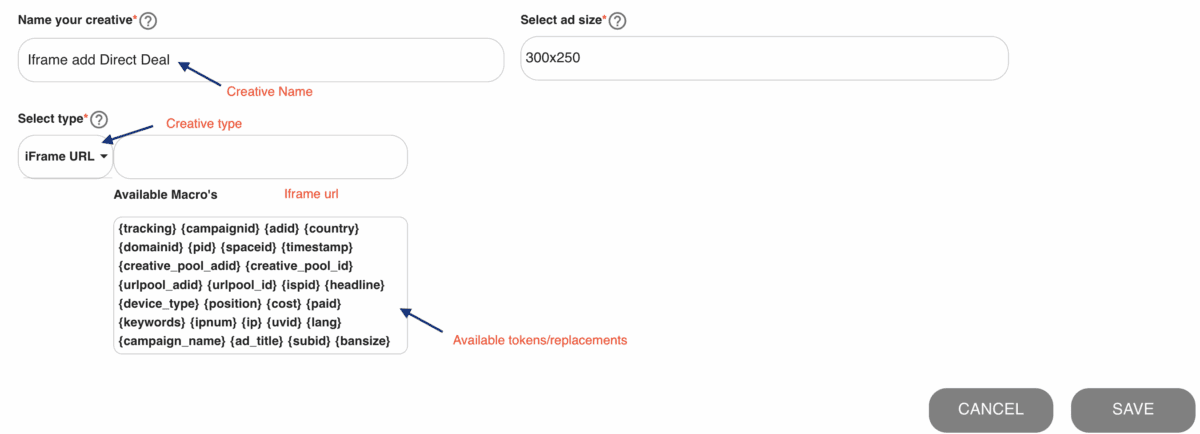
Step-by-Step Instructions:
Name Your Creative
- Enter a name for your creative. This is for internal use to help identify the creative later.
Select Ad Size
- Choose the appropriate ad size from the dropdown (e.g., 300×250). This should match the ad space selected earlier.
Choose Creative Type
From the dropdown, select how you want to upload or insert your creative. GAS supports multiple options:
- Upload a creative: Upload an image or file directly.
- iFrame URL: Provide a URL that loads the creative via iframe.
- Use HTML Code: Paste the full HTML for the ad (e.g., if it’s a banner with embedded tracking).
- Use Creative Pool: Select from pre-uploaded creatives in your pool.
- Hot-Link Image File: Use an external image URL + custom destination url.
- Hot-Link Video File: Use an external video URL + custom destination url.
- Hot-Link Iframe: Use a specific hotlinked iframe option + custom destination url.
Set the Destination URL
- If required, enter the click destination URL for the creative. This is where users will be redirected upon clicking the ad.
Use Available Macros (Optional)
- If needed, you can use available macros (e.g., {tracking}, {campaignid}) in the destination URL for dynamic tracking and reporting.
Click Save
- After filling in the required fields and selecting/uploading your creative, click SAVE to finalize the creative setup.
Step 4: Get the Adspace Code and Place It on Your Website
After saving your creative, the final step is to implement the Direct Deal on your site.
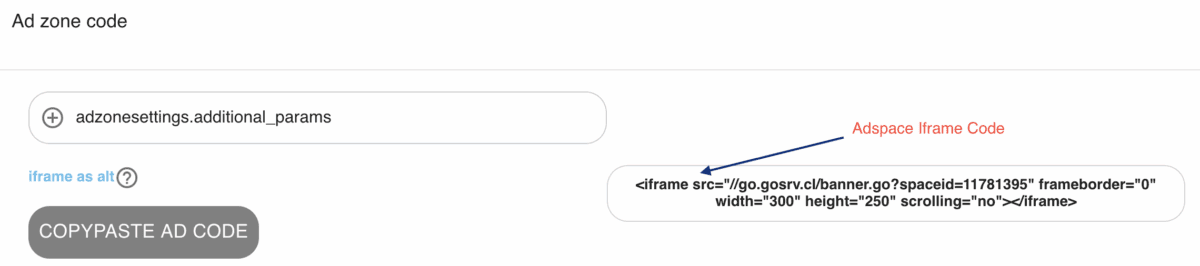
Locate the Adspace Code
- Go to the Publishing > Adspaces section in GAS, find the Adspace you selected for the Direct Deal, and edit it to view its code.
Copy the Code
- The code will be displayed in the “Ad zone code” field. Usually be and iframe code. Copy it.
Paste It into Your Website
- Insert the code into the HTML of your website where you want the Direct Deal ad to appear.
- This could be in the header, sidebar, or within specific pages — anywhere the ad should display.
- Once the code is embedded, the Direct Deal campaign will begin serving impressions according to the schedule and targeting you’ve configured.
Alternative Method: Create a Direct Deal from the Adzone Panel
As an alternative to creating a Direct Deal from the main dashboard, you can also initiate it directly from the adzone you plan to use:
![]()
Navigate to Publishing > Adzones
- In the main menu, go to the Publishing section and select Adzones.
Locate the Target Adzone
- Find the adzone you want to assign to the Direct Deal.
Click the Plus (+) Icon
- On the right side of the adzone entry, click the + icon to create the Direct Deal.
This shortcut will pre-select the adzone for you, saving time and reducing errors during setup. You can then proceed to configure your campaign details just as you would in the standard workflow.